DocumentationiPhone
Assets
On the phone, Assets is the register itself. It opens on the list, and everything you do to a machine starts from a row in it.
- For
- The register on the phone: browse assets, people, consumables, contracts and vendors, and open a record to verify, flag or edit it.
- Will not
- No full disposal record on the phone (that needs the Mac), and a removed record can't be edited. You can mark a machine Decommissioned and photograph the certificate.
- Writes
- Edits are staged until Save, then saved as one change; Cancel leaves no trace. Delete moves the record to Removed and keeps its history.
The tab opens on the register
Five collections sit in a strip under the title, and the one you almost always want is already showing.
Assets, People, Consumables, Contracts and Vendors. Swipe the strip sideways to reach the last two. Assets is the default, so arriving at the tab costs nothing.
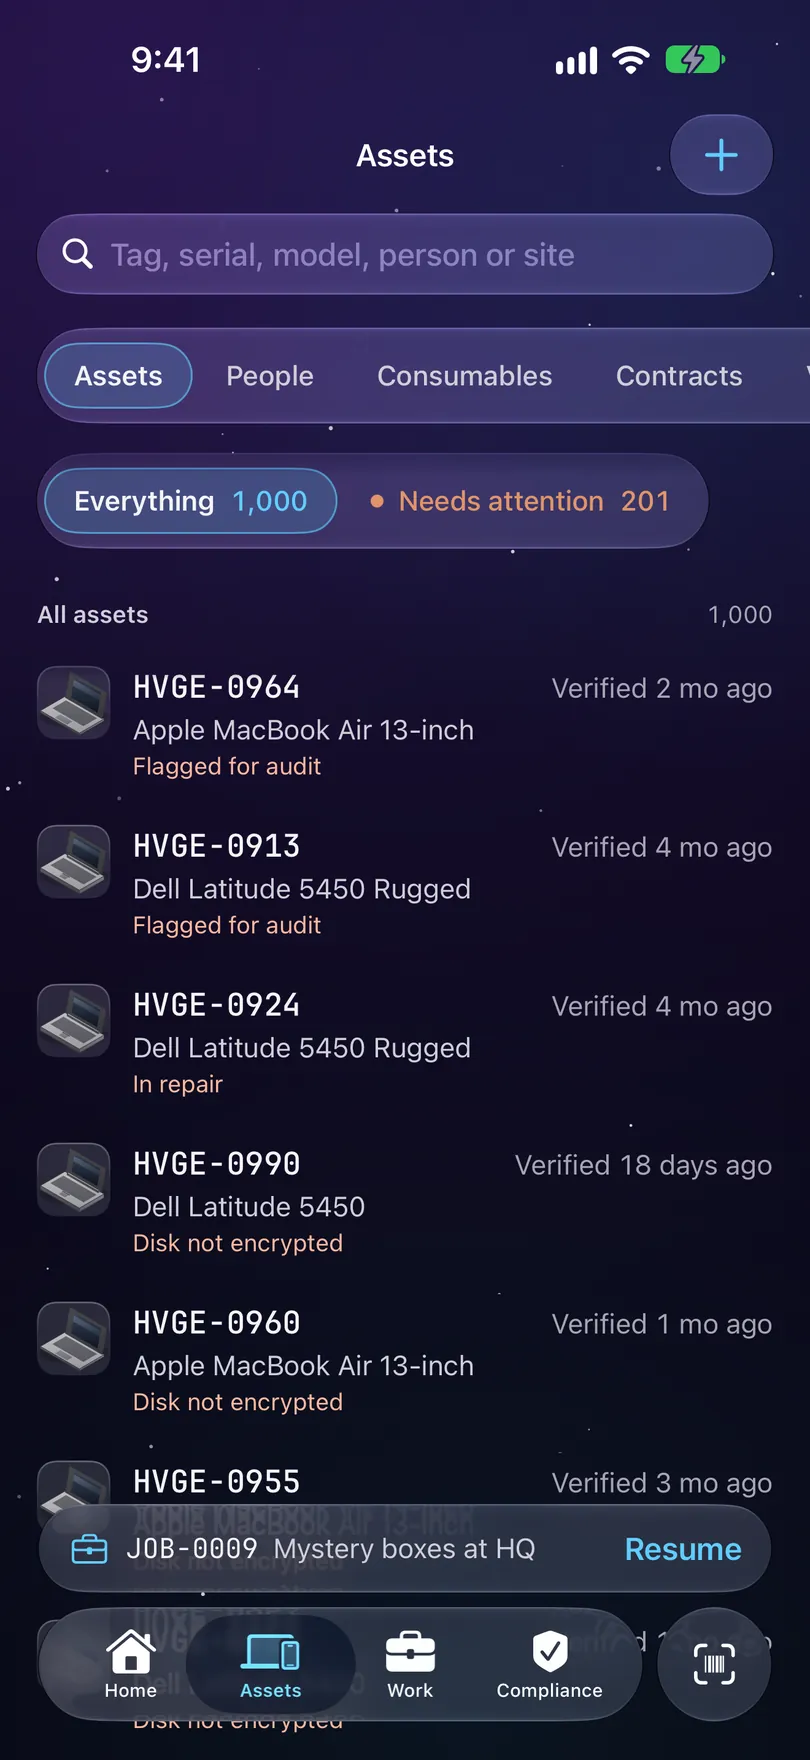
Tap any row to open it. A person opens their page with what they hold. A consumable, contract or vendor opens its own screen.
Reading a row
Each row answers which machine, what it is, and what's wrong with it.
The third line shows a problem when there is one: Flagged for audit, In repair, or Disk not encrypted on a machine in use. With no problem it shows who has it, then the site, then nothing.
The right side says when it was last verified: Verified today, Verified 5 days ago, Verified 14 mo ago, or Never verified.
A removed record shows who removed it and when instead, like Removed by Sam Lee with the day.
Searching
Every list has Apple's search bar at the top, always on.
On Assets the prompt is Tag, serial, model, person or site. Once you type, a scope row shows up: All, Tag, Serial, Person or Site, to narrow the search to one field. Clear the search and it goes back to All. Tap into the empty bar to see your recent searches, with Clear recent searches under them.
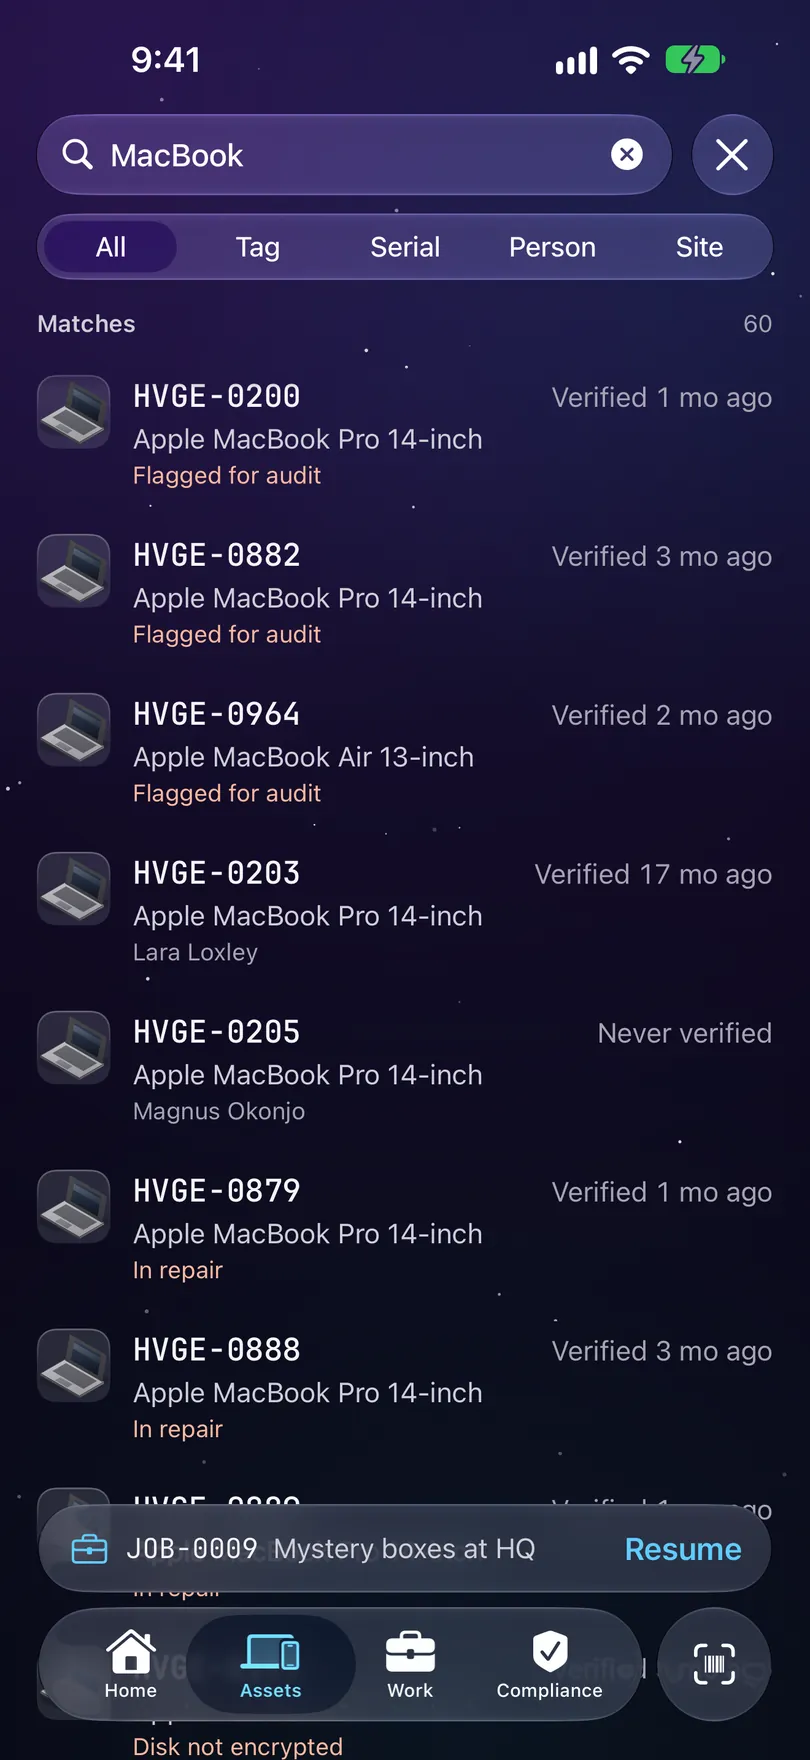
Under the search bar are Everything and Needs attention, each with its count beside it, like Needs attention 201. They sit in one glass strip that matches the tab bar, and the one you’re on is lit. Removed shows up there too once something has been deleted. A search always looks through the whole register, so typing switches you back to Everything.
When nothing matches, the list says so in terms of what you asked, like No asset matches C02XL2. or No asset tag contains 0042., and offers Add an asset with what you typed ready to use as its serial, make or model. If the tag belongs to a removed record, it says so and points you to Removed instead.
People searches by Name or department. Consumables, Contracts and Vendors search their own list, and an empty result has Clear the search.
Quick actions
Swipe a row to act on it without opening the record.
- Swipe right on an asset to Verify it.
- Swipe left to Check out (pick who it goes to) or Check in.
- On the Removed list, swipe left to Put it back. It asks first, and the removal and the restore both stay in the history.
A short note names the tag when it lands, because the row can move out of the list under your thumb. Long-press a row for the same actions. On Consumables, Contracts and Vendors, long-press a row for Delete.
Opening a record
Tap a row and the record opens. The most important facts come first, and the whole asset is there in one scroll.
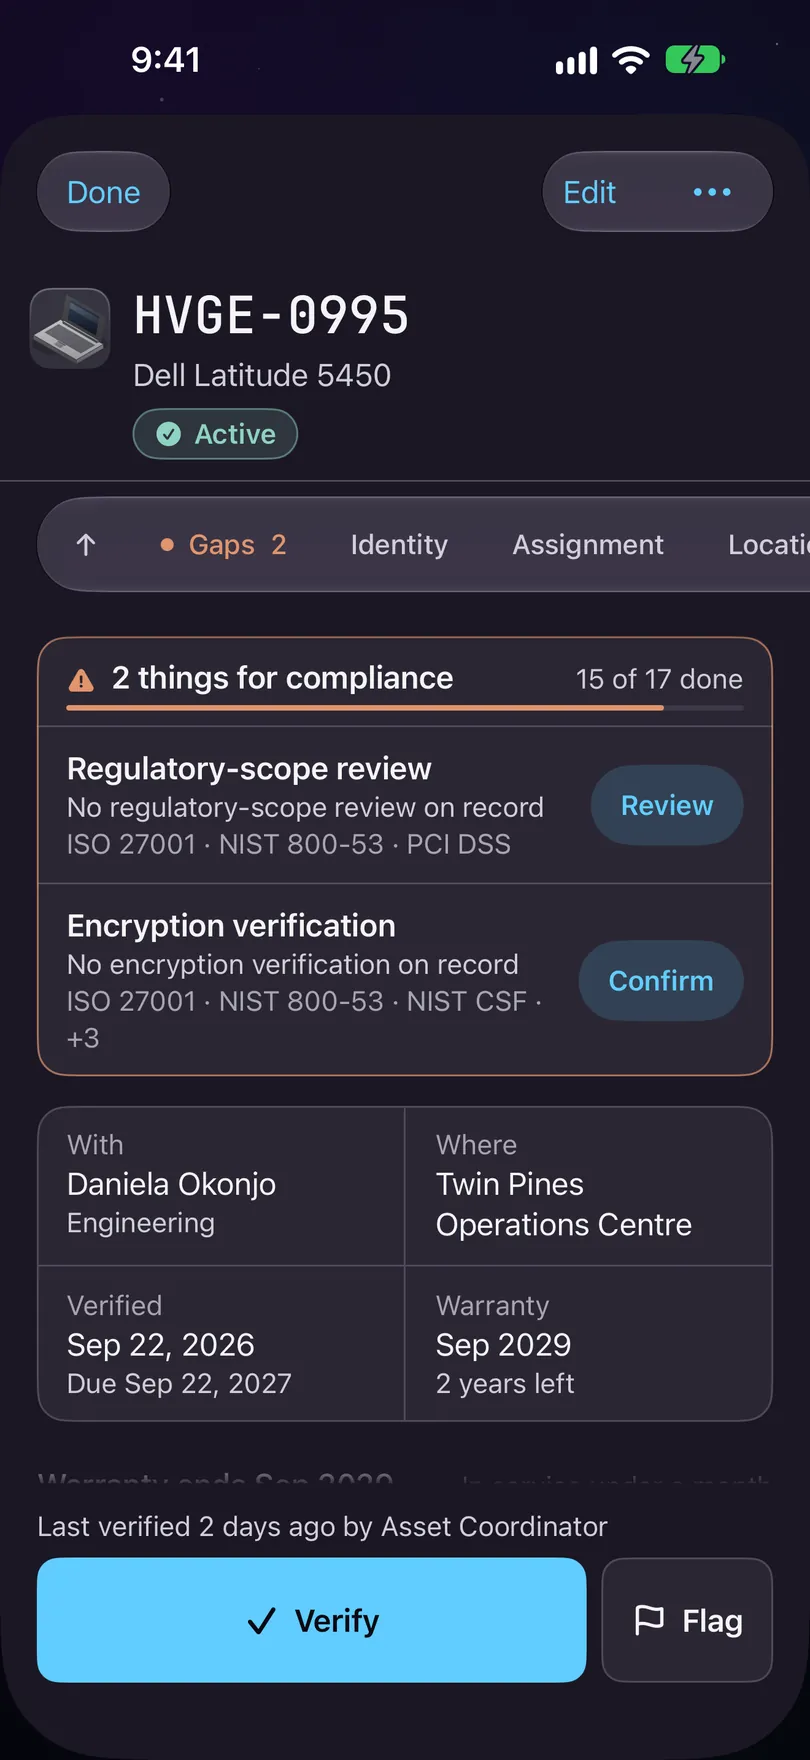
The toolbar has Done on the left, then Edit and ••• for the rest, including the label and writing an NFC tag. The asset tag sits under it at full size, with what the machine is and its status badge.
Under the heading, a jump bar stays pinned while you scroll. The up arrow takes you back to the top, Gaps appears when the asset is missing something for compliance, and there’s a chip for each section that starts open. The chip for the section you’re in lights up.
Then the glance card, with the four facts you check first: With, who has it, and their department; Where, the site or stockroom; Verified, when it was last seen and when it’s next due, or Overdue; and Warranty, the month it ends and how long is left. Empty ones say so: Unassigned, No location, Never and Not recorded.
Verify and Flag sit in a bar along the bottom, so they stay in reach wherever you are in the record. Above them, a line says when it was last verified and by whom, like Last verified 19 days ago by Asset Coordinator. Verify records that you’ve seen the machine, with your name and the time. Flag turns to Flagged once you raise it. With VoiceOver on, what you recorded is read out.
Under the glance card, a bar from in service to warranty end with a line like Warranty ends in 40 days or Warranty ended 3 days ago. Then Photographs, which says how many are kept on this iPhone or waiting to send.
Then the sections, each a card: Identity, Assignment, Location, Condition and Custom fields (if your register has any) start open. Lifecycle, Finance, Network & disk and Regulated data start folded, with a summary line, and open with a tap. Inside a card, each field is a tile with its label over its value. The empty fields fold into one Not recorded line of chips, like + Owner, so you can see what’s missing at a glance and tap one to fill it in. History sits at the bottom and can’t be edited.
The audit evidence an auditor asks for sits in those groups too. Assignment has Due back. Lifecycle has Received and End of support. Finance has Invoice, GL account and, for a machine you bought, Depreciation. Network & disk has Hostname, MAC address, IP address, Operating system, OS version, Device management, and Last seen once an integration or an import has given a date. Regulated data has Business use, flagged when the machine carries compliance rules and nobody has said what it’s for, and Approved to connect, which reads Pending review until somebody decides.
An IP address is typed by hand. The screen says so: Typed by hand. The IP address stays on your own devices: this iPhone and your paired Mac. It is never sent to Starkive Cloud.
What it still needs for compliance
Once your compliance scope is set, a record that's missing something your audit needs says so, at the top.
The card reads like 3 things for compliance, above the glance card. Each line is one missing piece of evidence, with the frameworks that ask for it, like Needed for ISO 27001, and one button. The button follows who closes the gap: Add for a value somebody types, Verify for being seen, Confirm for encryption read off the machine, Request when the holder has to give it, and Review for an administrator’s decision. A gap this phone can’t record says why, or says where it is recorded instead.
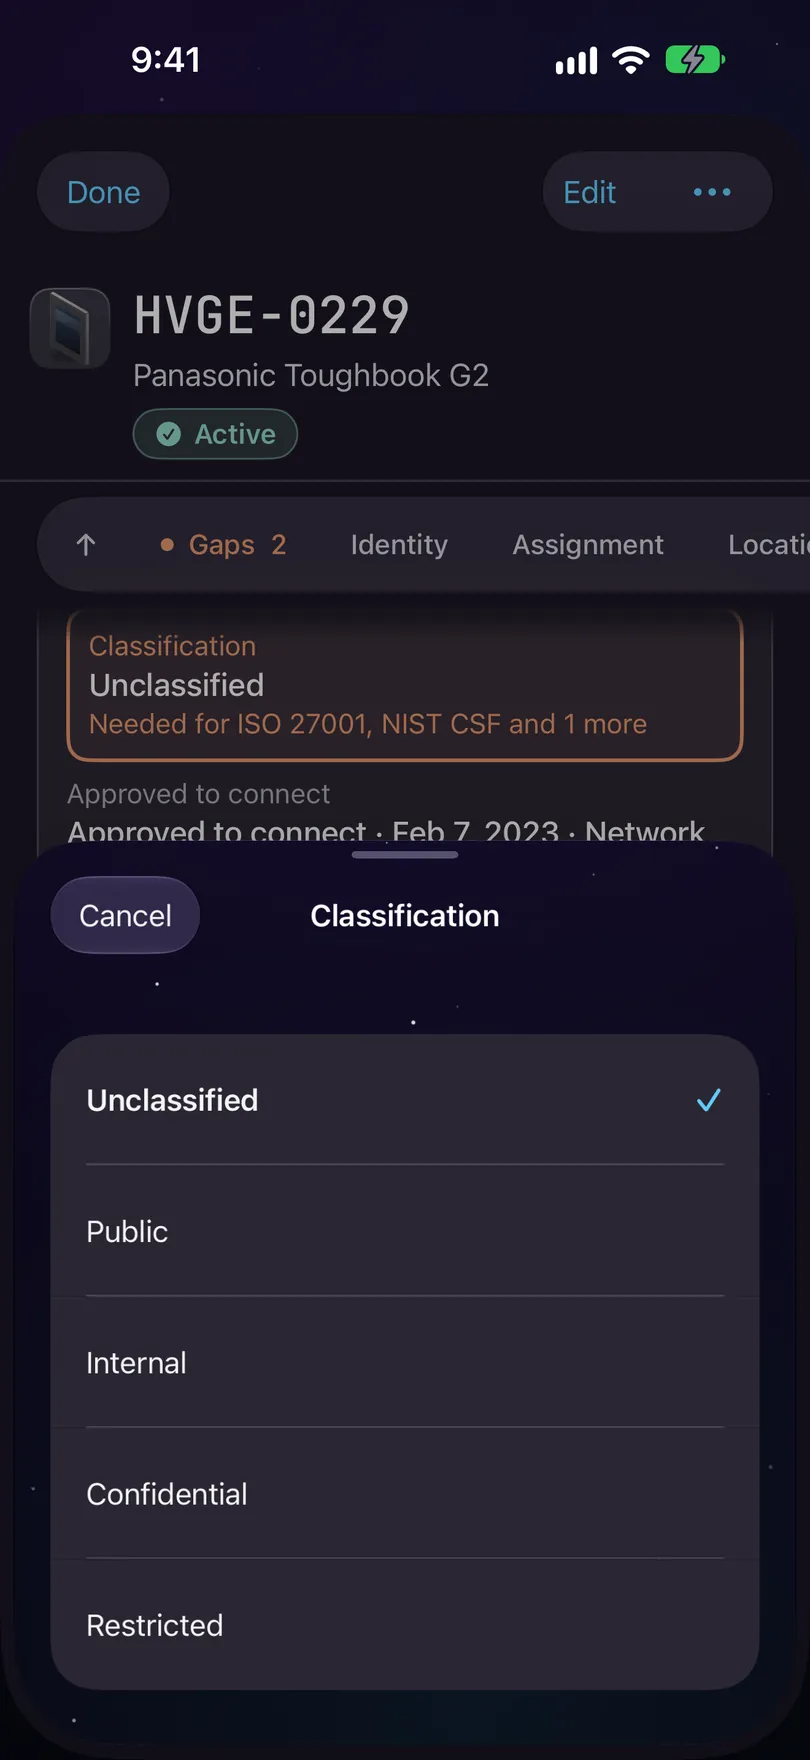
Following a gap never records anything by itself. Add lands on the field and opens it, with nothing staged. Verify takes you to the Verify button with a note that says Nothing has been recorded yet. Confirm opens the encryption check. Nothing is saved until you do the thing.
The Gaps chip on the jump bar comes straight here. With no compliance scope set there’s no card at all. See Compliance.
The ••• screen
The less common things you do to a record.
Tap ••• and a screen opens with:
- Show label: a QR code and tag you can hold up to scan, or print onto a sticker.
- Write NFC tag: puts this record’s link on a chip you stick to the machine. Only on an iPhone with NFC. See Scan.
- Read an invoice: price, vendor, PO and dates, read off the paper. Hidden on a device with no document camera.
- Check out or Check in: hand the machine to somebody, or take it back, as one change.
- Connection review: Approve to connect for a known device that belongs on your network, Mark not approved for one to remove or bring under management, or Return to pending review. The decision is recorded straight away, with your name and the date, and shows in History.
- Delete record: see Removing a record below.
Editing a record
One form, and nothing is saved until you press Save.
Tap Edit, or tap a value
Edit is at the top right. Tapping a value on the record, or a chip on a Not recorded line, also starts editing on that field.
Change what you need
The record turns into one form, with Cancel on the left and Save on the right. Condition comes first, with Status, then Identity, Assignment and the rest. Tap a row to change it: a list for a status, a keyboard for text, a calendar for a date, a list for a person or a site.
Press Save
Save counts what you’ve changed, like Save 3. One press saves them as one change in the history, not three separate edits.
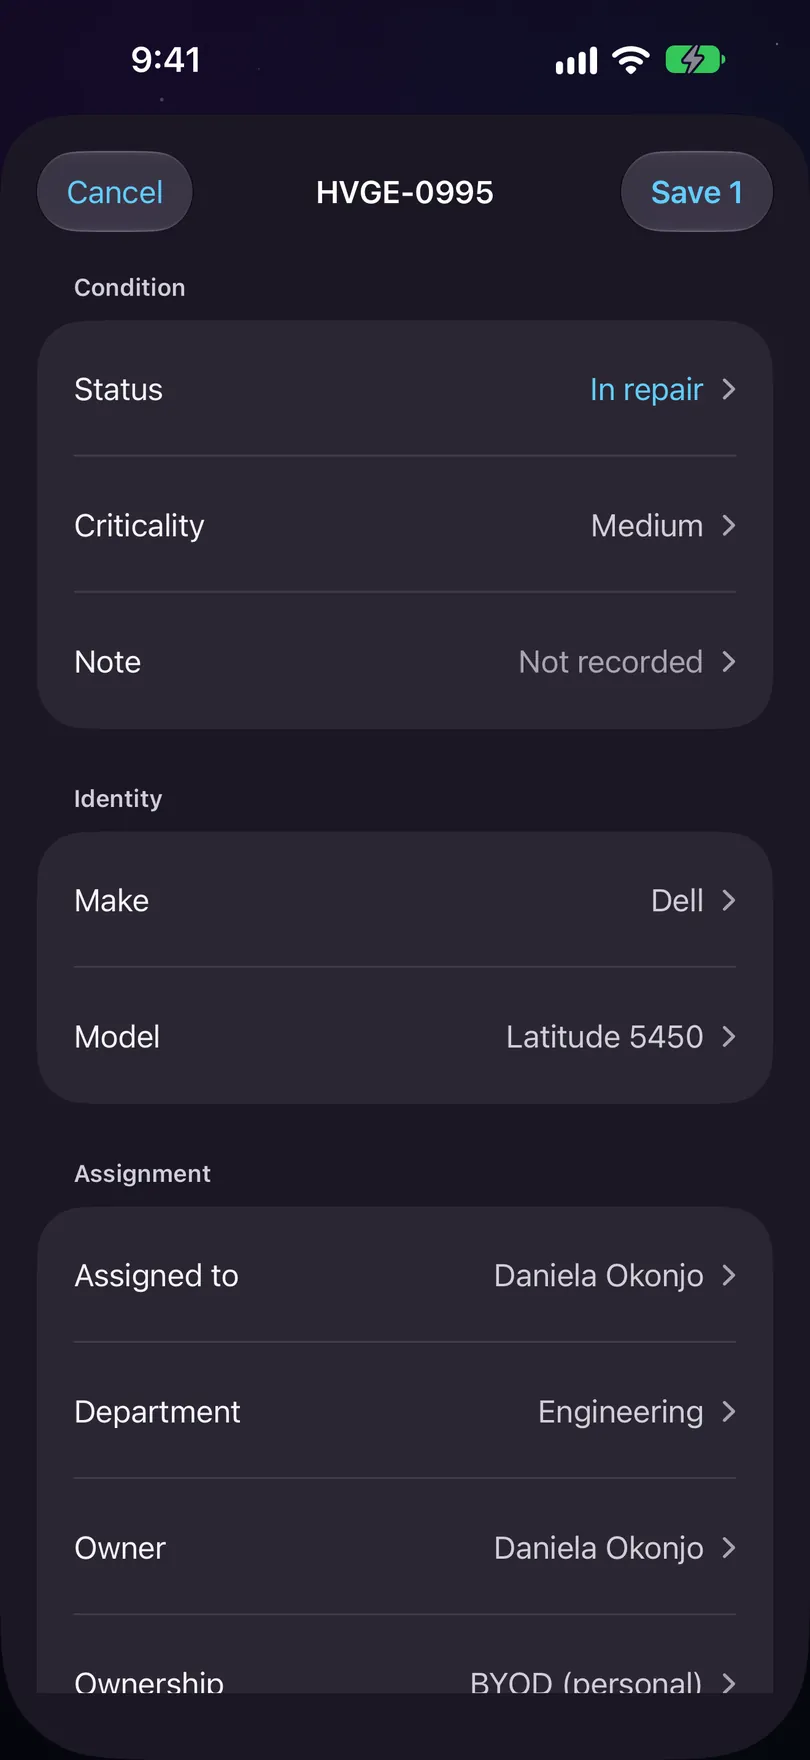
Cancel, or swiping the record down, asks Discard 3 changes? right on the record: your changes haven’t been saved, and discarding leaves the record as it was. It only asks when there’s something to lose. The same goes for New asset and the other add screens, so a swipe can’t throw away a half-filled form.
The status list has every status except Disposed, which needs a full disposal record on the Mac.
Custom fields
Fields your register needs that the app has no place for, like a host name or cost centre.
You set them up in Settings, Custom fields (the gear on Home), by hand or from a template. Once one exists, a record shows a Custom fields card right after Condition, with the fields meant for that kind of asset and any field that already holds a value. Its summary says None recorded or 2 of 3 recorded. Every field is there: a filled one is a tile, and an empty one is a chip on the card’s Not recorded line, so you can see what’s missing.
Tap a field to fill it in. Text and numbers get a keyboard. A date gets a calendar with Record today and Clear this date. Yes / No and choice fields get a list to pick from. It saves with the rest of your changes.
New asset has a Custom fields section too, so you can fill them in while adding a machine. Once you pick a kind that has a template, it also offers a line like Add fields for laptops and desktops. Nothing is added until you pick fields there. Changes show in History by the field’s name.
A value can be up to 500 characters. A field set to Keep off Starkive Cloud shows like any other, but what you type stays on this iPhone and your paired Mac.
Lost or stolen
The status says it's missing. Taking it off book value is a separate call.
Missing machines often turn up, so marking one Lost or Stolen doesn’t change the money on its own. If the machine is company-owned and still carries book value, the form asks Remove from book value? at the bottom of the screen. Its cost and depreciation stop counting in book value and Finance. Lease rent and support still count. It’s recorded in the audit trail, and you can return it to book value later.
- Remove from book value stages the write-off next to the status, shown as Removed from book value when you save. One Save writes both.
- Keep on the books leaves the money as it was.
A leased machine isn’t asked, because it has no book value to remove. After saving, Finance shows Book value with Written off, the day and who did it.
If it turns up, set it back to a status like Active. The record asks Return to book value? with Return to book value or Keep written off.
Step by step: Mark a machine lost or stolen.
Mark a machine lost or stolen
Set the status, decide about book value, and what gets recorded.
Transcript
- When a machine goes missing, mark it lost or stolen.
- Search for its tag and open the record. The pill in the heading shows the status: Active.
- Tap the pill and choose Lost. The change is staged — nothing is written until you save.
- Because this machine is company-owned and carries book value, Manifest asks: Remove from book value?
- Its cost and depreciation will stop counting in book value and Finance. Lease rent and support still count, and you can return it to book value later.
- Remove from book value takes it off the books. Keep on the books leaves the money as it was.
- Save writes both together: the status and the write-off. The record is back, and the pill reads Lost.
- In the Financial band, a Book value row says the machine is written off, and who did it, and when.
- If it turns up, tap the pill, choose Active, and answer the mirror question: Return to book value.
- Both moments are in the record's Activity trail — what happened, your name, and the date.
Reading an invoice
Price, vendor, PO and dates come off a piece of paper, and typing them one-handed in a rack aisle is why they stay empty.
Read an invoice on the … screen opens the document camera. Point it at an invoice, a packing list or an asset label, and the text is read on the phone. What it finds is staged into an edit for you to check, so you can drop anything you disagree with before saving.
The review shows up even when nothing was found, so a page that couldn’t be read says so instead of looking like the camera failed.
Removing a record
Delete is for a record that shouldn't exist. It isn't how a machine leaves the organisation.
Delete record is on the … screen. It asks Delete STRK-0042? right on that screen, for a record that shouldn’t exist, like a double scan or the wrong tag. The message says where it goes. On a phone holding its own register it moves to Removed. On a paired phone it’s removed when the phone next syncs. In Starkive Cloud it’s removed for everyone, and the button reads Delete everywhere. The history is kept every time.
The record stays open afterwards with a Removed stamp and the note STRK-0042 removed. It’s under Removed in Assets. To undo it, go to Removed and swipe to Put it back.
If the machine was actually disposed of, tap It was disposed of instead. That stages Decommissioned and shows Photograph the certificate, so the certificate files against this record. Save to keep it.
A removed record can’t be edited, verified or tagged. Scanning the sticker on a machine retired last year opens the record with its Removed stamp and no Edit button.
Consumables
The shelf, and changing how much is on it.
Each row leads with the name, then the count and reorder point, like 12 reams · reorder at 20 · time to reorder.
Tap one to open it. On the shelf shows how many, the reorder point and the stockroom. Change the count records what happened: Taken, Restocked or Counted, then Record it. Recent changes lists what was recorded.
The + adds a consumable on any phone that can record to the register: one holding its own register, one in Starkive Cloud, or one paired to a Mac. Deleting asks first, and says whether it removes the row from just this phone or from every device in the organisation.
Contracts and vendors
Leases, support and warranties, and who you have them with.
Contracts lists each contract with its standing: Active, Renewal due, Expired, Terminated or Open-ended. Tap one for its screen: status, number, type and vendor, then Dates (starts, ends, renewal notice, whether it renews by itself), then Cost. Monthly cost and total value stay hidden until you tap to show them.
Vendors lists who you buy from. A vendor’s screen has the contact details and every contract with that vendor, and each contract opens from there.
Both lists have a +. Add a contract asks for a title, type, vendor, dates, cost and currency. If the end date is before the start, it says Ends is before Starts. Check the dates. Add a vendor asks for a name, type and contact.