DocumentationiPhone
Settings
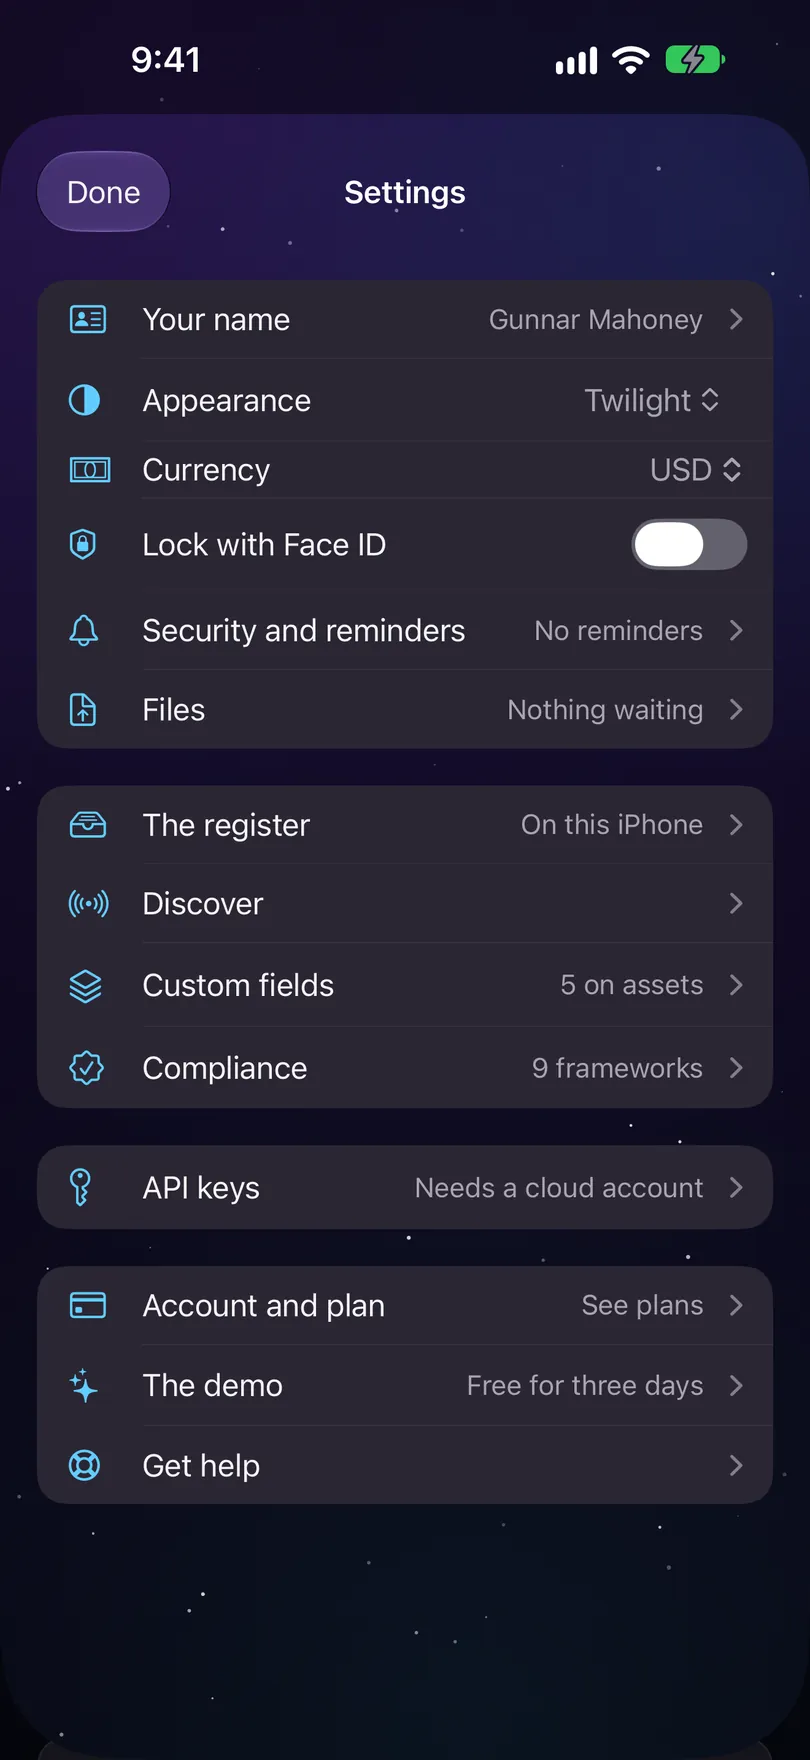
Settings on the iPhone is the gear at the top of Home. It's a list of places, not one long form. Each row names an area, shows the one thing worth knowing without opening it, and holds the controls behind it.
- For
- A list of places on the iPhone, each row naming an area and where it stands.
- Will not
- No iCloud Sync switch and no Data Residency warning. Those controls either did nothing or couldn't be honoured.
- On iPhone
- The account deletion screen is shared with the Mac, so both say the same thing about the same irreversible act.
A list of places
The first screen answers where do I go at a glance. The controls are one tap in.
Tap the gear at the top of Home and Settings opens over it. Done closes it and puts you back on Home.
The rows come in groups: this phone, the register it holds, what it connects to, and the account paying for it. A row shows its standing on the right where there’s one worth seeing: who this phone signs as, which plan you’re on, how many custom fields there are. It reads the same values as the screen behind it, so the two never disagree.
Three rows are the control itself rather than a door to it. Appearance and Currency open a menu right under your thumb, and Lock with Face ID is a switch on the row.
This phone
Who it signs as, how it looks, what it costs in, whether it locks, what it reminds you about, and what's still on it.
- Your name. The name every edit, sighting and intake on this phone is signed with. The row says Not set until you add one, and until then work is signed as an unnamed operator.
- Appearance. Daybreak, Twilight or Midnight. See below.
- Currency. Shows the code, not the symbol, because USD and CAD both use
$. The menu lists them like EUR · Euro (€). Picking one asks first, because amounts already recorded are not converted: $1,250 becomes €1,250. - Lock with Face ID (or Touch ID, whichever this phone has). See below.
- Security and reminders. The lock, warranty and verification reminders, and how the register file is protected. The row says Nothing due, 3 scheduled, Reminders off or No reminders.
- Files. Photographs and documents still on this phone, with the count on the row. On a phone holding its own register they’re simply kept here, with their records.
Appearance
Three looks, and you can change it any time. Setup doesn't ask.
- Daybreak: a daylit sky, warm at one corner and cool at the other.
- Twilight: a violet starfield falling to deep night. It’s the one you start on.
- Midnight: the same starfield over a black night sky.
The app follows the iPhone’s own accessibility settings too. With Increase Contrast on, cards and filters get a firmer edge. With Reduce Transparency on, the glass is less see-through. Text follows your text size, and Reduce Motion skips the animations. With VoiceOver on, what you just recorded, like a Verify, is read out.
Face ID lock
One switch, and once it's on it covers everything, open sheets included.
Turn on Lock with Face ID and the register asks for Face ID before it opens. The note under the switch says Asks again after 3 minutes away., so a walk-round isn’t forty prompts.
When it locks, it covers the whole app, including a record or form you had open, and VoiceOver can’t read what’s underneath either. Unlock and you’re back where you were. Lock now in Security and reminders locks it straight away.
With no passcode set on the phone, the switch is off and says Set a passcode on this iPhone to use this.
The register shows up in iPhone search, so typing a tag from the Home Screen can open the record. Turning the lock on removes it from search, because otherwise anybody holding the unlocked phone could read tags, serials and holder names there.
The register
Where this phone's records live, how it was set up, and what it connects to.
The row says On this iPhone, On the Mac or In Starkive Cloud. Inside, the connection card says what that means now. A paired phone reads Connected to the Mac or The Mac isn’t on this network. A cloud phone reads Signed in to Starkive Cloud or Not signed in. A phone holding its own register reads The register is on this iPhone with Everything works here, with or without a connection.
Unpair is on the connection card when a Mac is paired. It asks first and says what goes with it: edits and photographs that haven’t reached the Mac, and anything recorded only on this iPhone.
Provisioning has Run setup again. It opens full screen with Close to back out. Your answers come back as you left them, and what you’ve recorded stays. The one exception, which the card spells out: moving the register somewhere else leaves its old copy behind. See First run.
Move to Starkive Cloud shows up when this phone holds assets of its own. It names the step still missing: a cloud plan, signing in, the organisation’s keys, or ready to go. See Where the register lives.
Other devices and Discover show up when there’s a Mac running Starkive on your Wi-Fi. Other devices holds the pairing form and the Macs found nearby. API keys is always listed, and says Needs a cloud account when it doesn’t apply yet, so you know it exists.
Custom fields
Add fields your register needs that the app has no place for, like a host name or cost centre.
The row is in the register’s group and says None yet or how many you have, like 3 on assets. Inside, the page lists your fields under On every asset.
Tap Add a field
Or the + at the top. This opens New field.
Name it and pick a type
Text, Number, Date, Yes / No or Single choice. Under the name you’ll see Recorded as and the key it’s saved under, which is what shows in exports.
For a choice field, add the choices
Tap Add a choice for each one. A choice field needs at least one.
Choose where its values are kept
Under Where values are kept, turn on Keep off Starkive Cloud if what people type into this field should never go to the cloud. Values then stay on this iPhone and your paired Mac. Leave it off and, in Starkive Cloud, values are encrypted on the phone before they sync.
Pick which kinds of asset it's for
Offered on lists every kind of asset. Tick none and the field is offered on every asset. Tick some, like Mobile and Tablet, and only those records offer it. A value already recorded always shows, whatever the kind.
Tap Add
The field shows up on the records it’s offered on, and on New asset, straight away.
The line under your list says where fields go. In Starkive Cloud it reads Field names and choices are shared with your organisation. What you type is encrypted on this device before it leaves, and Starkive can’t read it. Don’t put anything private in a field’s name or choices: the sheet says so too.
There are limits, the same on the Mac and every plan: 50 fields on assets, names up to 60 characters, up to 50 choices of 100 characters each, and 500 characters in any one value. If you hit one, the sheet says which and stays open.
Tap a field later to rename it or change its choices, then Save. The type stays as it is, because values already recorded were typed as that type. Remove this field asks first. A removed field stops being offered on new and existing assets, and what was already recorded in it stays on those assets.
Fields from a template
Ready-made fields for each kind of asset. Nothing is added until you pick it.
Under your list, tap Add from a template. The Templates screen lists Laptops and desktops, Phones and tablets, Monitors, Servers, Network gear and Printers.
Open a kind
Each field shows its type, and anything unusual about it, like Laptop only or Kept off Starkive Cloud. A field you already have reads Already added.
Turn on the ones you want
Turning one on lets you rename it and set Keep off Starkive Cloud for that field.
Tap Add
The button counts them, like Add 3 fields. Each one is offered only on that kind of asset, and after that it’s an ordinary custom field you can change or remove.
Phones and tablets include IMEI. Two template fields start kept off Starkive Cloud: Phone number on phones and tablets, and Remote management address on servers. You can change that before you add them.
New asset offers the same thing once you pick a kind: a line like Add fields for monitors in its Custom fields section.
To fill fields in, see Assets, Custom fields, or the guide Add a custom field and fill it in.
Pairing with a Mac
Only when a Mac running Starkive is on your Wi-Fi. The form is on the Other devices screen.
Open Settings → iPhone App on the Mac
The Mac shows a six-digit code and a four-digit check under it.
Type both on the phone
The code goes in the first field, the check in the second. The device name is what the Mac will call this phone.
Tap Pair
If it doesn’t work, the reason shows under the fields: no Mac on this network yet, a code that isn’t six digits, a check that isn’t four, or a code that wasn’t accepted. Codes expire, so read a fresh one off the Mac.
More in Pairing with the Mac.
Admins and Devices
Two rows that show up once you're signed in. One is about a person joining, the other about a phone being let in.
Admins is where you invite somebody to sign in and hold a device. It isn’t the directory: that’s People, under Assets.
Devices is where a phone is let into the organisation’s encryption. The row says which state you’re in: Not set up, Waiting to be let in, or let in. The first device in a new organisation sets it up, and every device after that waits for one that already has it to approve it.
Both rows show even when the account hasn’t started an organisation yet, and both say so rather than opening a blank screen.
Where Requests, Vendors and Contracts went
They're records, not settings, so they moved.
Requests are on the Work tab, with jobs. Contracts and Vendors are collections under Assets, where you can open and add them.
Account and plan
The subscription, signing in, exporting the register, and closing the account.
The row shows your standing: Your plan when you’ve subscribed, See plans otherwise. There’s no free trial. The free look is the demo, and Settings keeps a way back into it under The demo.
Your register exports every asset on this iPhone as a CSV through the share sheet, with Export the register. It works whatever your plan says, even after a subscription ends.
Sign in shows when this phone isn’t signed in, with Reach your register from anywhere, and keep a cloud copy under it. Once signed in it becomes Signed in and opens the account screen, where the devices and signing out live.
Delete this account is last, only when signed in, and names the account it closes. It closes the account on the server and can’t be undone.
Get help is the last row in Settings. It sends a note to Starkive from the app, and a person reads it and replies to the address you give.
What is not here
Two things that used to be on this screen.
There’s no iCloud Sync switch. There was one, and flipping it did nothing. Starkive Cloud isn’t iCloud, and where the register lives is chosen in setup and shown under The register.
There’s no Data Residency warning. The screen couldn’t keep the promise it made.